

How to Fix a Chipped or Cracked Bathtub Without Replacing It
Over the years, I’ve helped hundreds of homeowners weigh the decision between repairing and replacing their bathtub—and more often than not, the right fix is simpler (and cheaper) than you’d expect. If you’re staring at a crack or chip in your tub, don’t panic. Most minor damage can be restored to like-new condition without a full replacement. The trick is knowing when to repair, how to do it right, and when it’s time to move on to a new tub entirely.
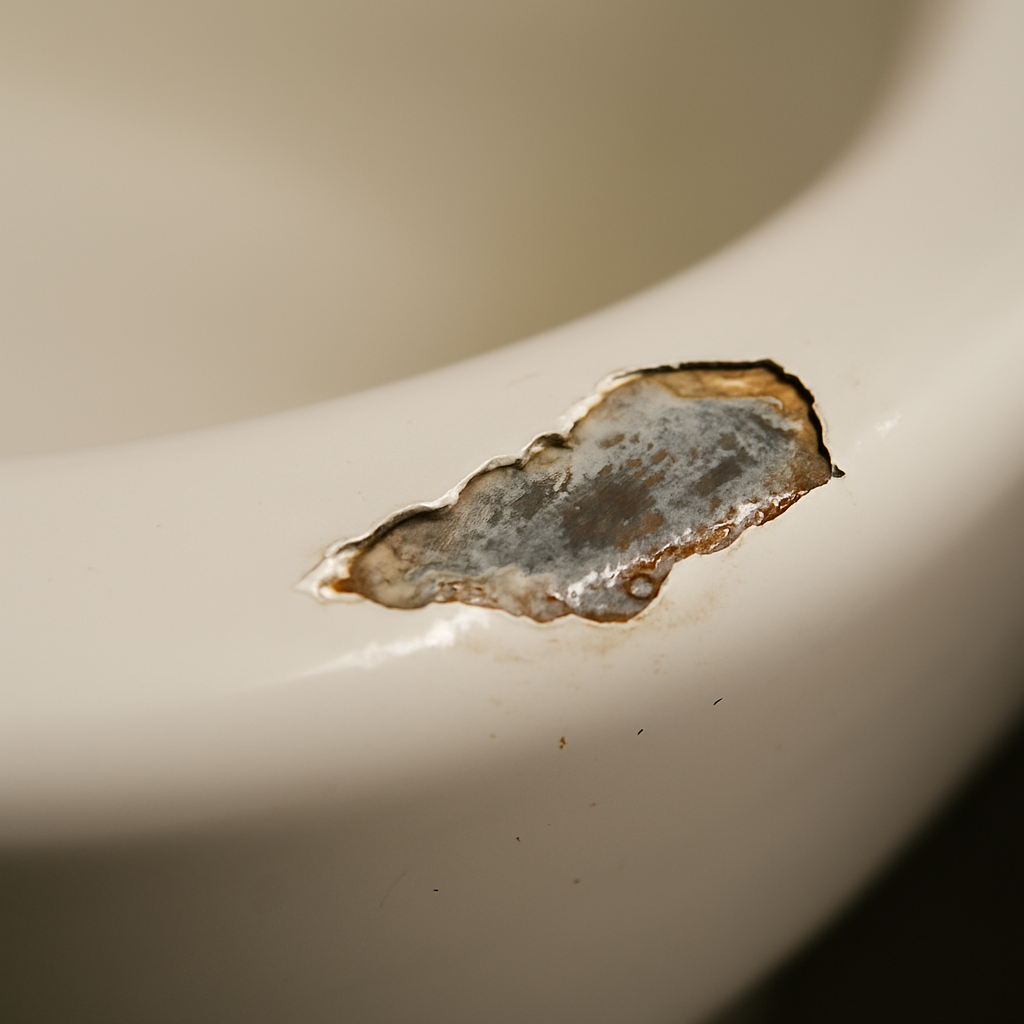
Understanding the Damage: Chip vs. Crack
Not all tub damage is created equal. A chip is typically a small surface blemish—often in the enamel or finish—that doesn’t compromise the tub’s structure. These are usually cosmetic, though if ignored, they can lead to rust or bacteria buildup.
A crack, on the other hand, can indicate deeper problems. Surface cracks can sometimes be repaired easily, but deep or expanding cracks—especially in fiberglass or acrylic tubs—may point to structural weakness.
What Materials Can Be Repaired?
Most tubs, whether fiberglass, acrylic, porcelain, or enamel-coated cast iron, can be repaired with the right materials:
- Fiberglass and Acrylic: Easily repairable with fiberglass patch kits and epoxy.
- Porcelain and Enamel: Chips can be filled with porcelain repair kits and color-matched to your tub.
- Cast Iron: Small chips and surface cracks can be patched, but rust underneath the enamel often signals a bigger issue.
The key is choosing the right repair method based on your tub’s material.
How to Repair a Chipped Bathtub
Here’s how I guide my clients through repairing a chip in a porcelain or enamel tub:
- Clean the Area Thoroughly: Remove soap scum, oils, and debris. You want a totally dry surface.
- Sand the Damaged Spot: Gently rough up the area with fine sandpaper to help the filler adhere.
- Apply Porcelain Repair Epoxy: Most kits come with a two-part filler. Mix and apply carefully using a small applicator.
- Let It Cure: Depending on the product, this could take several hours to a day.
- Sand and Polish: Once cured, sand lightly again to smooth it out, then polish for a consistent finish.
You can find kits online or at your local hardware store. If you’re not confident matching the color or finish, I usually suggest calling in a pro for a flawless job.
How to Fix a Cracked Bathtub
Small cracks, especially in fiberglass or acrylic tubs, are manageable with a similar approach:
- Drill Small Holes at Each End of the Crack: This stops it from spreading.
- Clean and Sand the Crack: Prepares the area for adhesion.
- Apply Fiberglass Filler or Epoxy Resin: Smooth it over with a putty knife.
- Sand and Paint: Once cured, sand and refinish the area with color-matched paint or coating.
For deeper cracks or flexing tubs, it may be time to evaluate the tub’s overall structure.
How to Prevent Bathtub Damage and Extend Its Lifespan
While chips and cracks can often be repaired, prevention is always better (and cheaper) than a cure. After working in hundreds of bathrooms across California, I’ve found that most bathtub damage is avoidable with just a few simple habits and materials. Here’s how to protect your tub and keep it looking beautiful for years.
Be Gentle With Heavy Objects
One of the most common causes of chips in porcelain or enamel tubs is dropping heavy items—like shampoo bottles, razors, or metal bath accessories. Install shelves or built-in niches to keep items secure and off the tub ledge. If you’re using a shower caddy, opt for a suction-mounted or wall-hanging style to reduce the risk of slipping objects.
Use a Bath Mat or Protective Liner
If you’re bathing kids, pets, or frequently standing in the tub, consider a high-quality non-slip bath mat. Not only does it improve safety, but it also cushions the surface from daily wear. For heavier usage, like washing tools or buckets in the tub, lay down a rubber liner to create a buffer zone.
Avoid Harsh Cleaners and Scrubbing Tools
Harsh abrasives, bleach, or scouring pads can eat away at the protective finish of your tub—making it more prone to staining, dullness, and eventually cracking. Instead, clean your tub with gentle, pH-balanced cleaners and soft sponges. Vinegar and baking soda can also work wonders without doing damage.
Maintain Proper Support
Over time, poor installation or structural shifting can cause stress cracks in the base of the tub. If your tub feels bouncy, squeaky, or unstable, have a professional inspect it for subfloor or support issues before damage sets in.
Address Small Damage Early
That tiny chip you notice today can grow into a hairline crack tomorrow. Don’t ignore minor surface issues—tackle them early with a DIY kit or have a professional refinish the surface. Acting quickly can prevent moisture from seeping in and causing more expensive repairs down the road.
When Is It Time to Replace Your Bathtub?
While repairs are often effective, there are times when replacement is the smarter route. Here’s when I tell my clients it’s time to consider a new tub:
- Recurring Leaks: If you’ve fixed it before and it’s leaking again, structural failure is likely.
- Multiple Cracks: One crack is repairable. Several cracks usually mean your tub is deteriorating.
- Widespread Rust: Surface rust can be treated, but if it’s spread beneath the enamel or is bubbling through, the damage is too deep.
- Tubs That Flex or Move: If your tub isn’t stable or creaks under your feet, the support structure is failing—this can’t be fixed with a patch kit.
In those cases, I help my clients choose a durable, low-maintenance replacement tub and guide them through options like walk-ins, soaking tubs, or budget-friendly acrylic units.

Navigating the Replacement Process
If you’re leaning toward a new tub, don’t stress—replacements aren’t as intimidating as they sound. My advice is to:
- Get Multiple Quotes: Labor costs vary widely. Look for professionals with specific experience in bathtub removal and installation.
- Consider Full Surround Replacement: If your walls are outdated or water-damaged, it’s often smarter (and cheaper long term) to replace the surround along with the tub.
- Think About Upgrades: If you’ve wanted to switch to a freestanding tub or add grab bars or shelving, now’s the time.
The cost of a replacement varies but typically ranges from $800 to $3,000+ depending on the material and scope of work. For many of my clients, the upgrade in comfort and appearance makes it well worth it.
Final Thoughts
Bathtub damage doesn’t have to mean an expensive remodel. Most chips and cracks can be repaired with a little patience or the right professional help. But if the damage is severe, replacement may be the smartest long-term solution.
Whether you’re dealing with a tiny chip or looking at a total replacement, I’m here to help you make a confident, informed choice—and fall in love with your bathroom again.
About the Author
Taylor Jones is a University of California graduate with a degree in Interior Design. As the founder of a thriving home renovation company based in California, Taylor has spent over eight years specializing in bathroom remodeling, accessible design, and luxury bath installations. She is also a contributing writer and editor for USA Shower and Bath, where she shares expert insights to help homeowners make confident, stylish, and functional upgrades to their spaces.
